Character
Beginner Designer
Characters are used for player and NPC movement. Entities with character components can be moved with Move, TryJump, and teleported by setting its Position property.
Add a Character Component to an Entity
In the Scene Editor, select the entity you want to add the component to.
In the Property Grid, click
Add component, hoverPhysics - Bepuand selectCharacterComponent.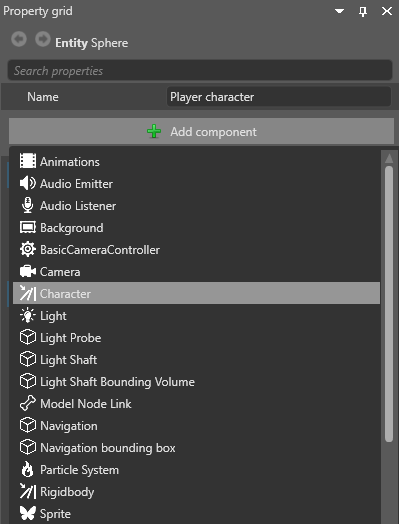
Note
You will need to set a collider for this newly created character, you can do so through the Collider property. The capsule shape is appropriate for most character colliders. For more information, see collider shapes.
Warning
Never use mesh colliders for characters, use them only for statics, they are far too slow to be used as characters. If you absolutely need a more complex shape than the primitive ones, use a convex hull instead, see collider shapes.
Have a look at the API for more detail on the properties of this component.
Mass and MaximumHorizontalForce
While movement for the character component behaves in a more kinematic fashion, it is still based on forces, this is done to ensure pushing objects and setting up constraints is intuitive.
For a character to move, it first has to exert enough force to displace its own collider's Mass.
The amount of force they exert is based on Speed and MoveVector, but is ultimately limited by the MaximumHorizontalForce.
A character's acceleration, deceleration and top speed will be reduced if this value is too low.
This relationship extends even further to the physics world; if the character is against a large object, or constrained to a large object,
that object's Mass will be taken into account. If the MaximumHorizontalForce is too low, the force exerted won't be enough to push the object.
You can use this property and balance the masses of your different objects to control which bodies the character can and cannot pull.
MoveVector Internals
When the character touches an object on a slope under SlopeAngle it considers the object's surface as a 'supporting surface',
the character becomes attached to this surface and walks along it. Walking on the surface is done by considering it as a 2D plane.
Given that it is a 2D plane, the character would only have two axis of freedom to move along it,
MoveVector's values controls the movement along these axes.
But, as a user of the API, this would be too abstract to manipulate, you would need a more intuitive way to control movement regardless of the gravity or surface direction.
Which is why MoveVector is projected from the Character's Orientation, transforming it into a more intuitive 'local' axis.
Common Pitfalls
Moving in the wrong direction
MoveVector is local to the Character's Orientation.
- X is the local X axis, +X being to its left, and -X being to its right.
- Y is the local Z axis, +Z being forward, and -Z backward.
You can take a look at how the arrow Gizmo looks in the editor to get a more intuitive idea of how this is laid out.
If you want to re-orient this direction, you can transform the vector before you pass it to MoveVector, change the character's Orientation,
preferably through SetTargetPose(Quaternion targetOrientation),
or customize the Character Component
Ice skating: taking too long to start moving and come to a stop
Controlling this potentially unwanted behavior is done by tweaking the character collider's Mass,
its MaximumHorizontalForce and sometimes the surface's friction coefficient.
- The friction coefficient defines how rough the surface is; 0 would be a perfectly smooth surface keeping the momentum of your character going, while a value of 1 would be the opposite.
- Mass and MaximumHorizontalForce is described over here
Too slow regardless of Speed
See Mass and MaximumHorizontalForce
Custom Character Controllers
When creating a controller, it is recommended to create a new class deriving from this component instead of using it as is, you can access its internal state and override it with your own logic to better fit your game.
using BepuPhysics;
using Stride.BepuPhysics;
using Stride.BepuPhysics.Systems.Characters;

public class MyCharacterController : CharacterComponent
{
    protected override void SimulationUpdate(BepuSimulation sim, float simTimeStep, ref InternalCharacterData character, in BodyReference characterBody, out bool wakeupBody)
    {
        // Will mutate 'character', the internal state of this component in the physics engine, based on this.Orientation, MoveVector, and other properties of this component
        base.SimulationUpdate(sim, simTimeStep, ref character, characterBody, out wakeupBody);
        // You can mutate 'character' further down here based on what you want to achieve
    }

    public override void TryJump()
    {
        base.TryJump();
    }
}
You may also start from a completely blank slate by deriving from CharacterComponentAbstract to implement your own physics and properties:
using BepuPhysics;
using Stride.BepuPhysics;
using Stride.BepuPhysics.Systems.Characters;

public class MyCharacterController : CharacterComponentAbstract
{
    protected override void SimulationUpdate(BepuSimulation sim, float simTimeStep, ref InternalCharacterData character, in BodyReference characterBody, out bool wakeupBody)
    {
        // You will have to mutate 'character' and `wakeupBody` directly to affect the internal state of this component in the physics engine
        // Best start off by copying the source implementation of CharacterComponent: https://github.com/stride3d/stride/blob/master/sources/engine/Stride.BepuPhysics/Stride.BepuPhysics/CharacterComponent.cs
        // And tweak it to your needs
    }
}