Create a project
Beginner
This page explains how to create a new project from a template or sample:
- Template - a project that contain just the necessary elements to start working on a game.
- Sample - a complete game, which you can learn from or base a new game on.
Create a new project with Game Studio
To create a new project:
In the Stride Launcher, click Start to start Game Studio.
The New/open project dialog opens.
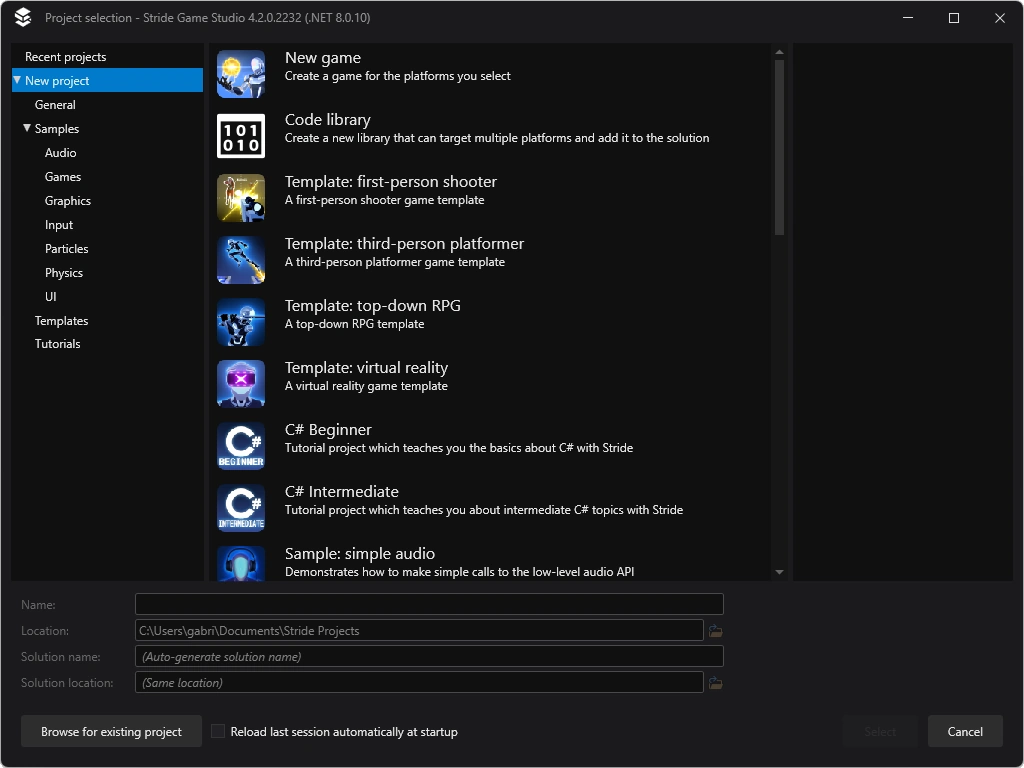
You can also open this dialog in Game Studio from File > New.
Select a project template or sample. An empty template can be found in General > New Game.
In the Name and Location fields, specify a name for the project and the folder to save it in.
Click Select.
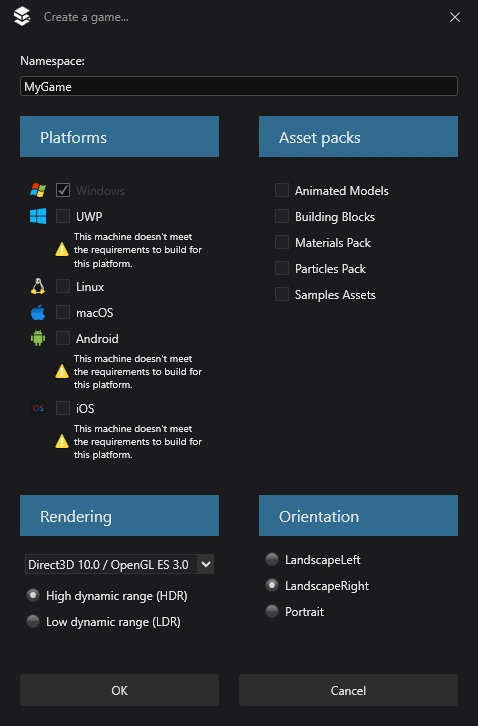
The Create a new game dialog opens.
Note
The list of available options can differ depending on the template or sample.
In the Namespace field, specify the namespace you want to use. If you don't know what your namespace should be, leave it as default.
Under Platforms, select the platforms you want your game to support.
Note
To support iOS and Android, you need to install Xamarin (free if you have Visual Studio). If your development system is missing prerequisites for any of the platforms you select, Stride displays a warning.
Under Asset Packs, you can select additional assets to include in your project. These include assets such as animations and materials. The asset packs are fun to play with when you're learning how to use Stride, but they're not necessary.
Under Rendering, select the options you want.
Graphics Profile: The graphics features you can use in your project depend on the profile you select. For advanced graphics features, select the latest version of the graphics profiles.
Warning
Some graphics cards don't support the latest graphics profiles. For some mobile devices, only Level 9.3 and Level 10.0 are available.
High or Low Dynamic Range (HDR / LDR): This defines how color is computed in your project. In LDR mode, colors range from 0 to 1. In HDR mode colors can take any float value. HDR provides more advanced and realistic rendering but requires more processing power and profile Level 10.0 or later.
Under Orientation, choose the orientation for your project. For PC games, use landscape. Portrait should usually only be used for mobile games.
Click OK.
Stride creates the project and opens it in Game Studio. For more information, see Game Studio.
Create a project with Stride CLI
The Stride CLI tool provides a way of creating new projects without the need for a GUI.
Before starting, make sure to install the Stride CLI. For instructions on how to do this, visit the Stride CLI page.
Find the template you want to use. The default project template is named
stride-game. For a list of all stride templates, use this command:stride new listThe blank template is called game.
Create the project.
stride new TemplateNameHere -n ProjectNameHereOpen the project in Game Studio.
stride studio ./ProjectNameHere
Template parameters
All Stride templates can take additional parameters to change how they are created. Here's a list of the most commonly used ones:
| Parameter | Values | Description |
|---|---|---|
-n |
text | Name of the project. |
--platform |
host (the current os), window, linux, macos, android, ios |
Platform(s) the project should target, separated by the | character. |
--HDR |
true, false |
Determines if the project uses HDR (required graphics profile >= 10.0). |
--graphics-profile |
9.0, 10.0, 11.0, ... |
The graphics profile to use. This can be changed later. |
--orientation |
Default, LandscapeLeft, LandscapeRight, Portrait |
The game's orientation on mobile devices. This can be changed later. |
For a list of all available parameters in a template, use the --help flag.
Example command:
stride new game -n ProjectX --HDR true --platform windows`|linux
Asset packs
Stride provides additional asset packs to help you more easily get started working on a game. These asset packs can be added through the CLI at any point after a project's creation.
Go to your project's main project package directory (the one that ends with
.Game).cd ./NameOfGame/NameOfGame.GameFind the asset pack you want to use. For a list of all asset packs, use the following command and look for items under
Stride.Templates.AssetPacks.stride new listAdd the asset pack to your project with the following command:
stride new AssetPackIdHere
You should now notice new files appear in the Assets and Resources folders.
Create a project with dotnet templates
An alternative way of creating a project from the command line without the need for Stride CLI is to use dotnet templates.
Before starting, make sure to install the template packages. For more information about what each package contains, read the README on their nuget.org page.
# Install the blank stride-game template
dotnet new install Stride.Templates.Games
# Install other templates
dotnet new install Stride.Templates.Games.Starters
# Install samples (complete games)
dotnet new install Stride.Templates.Samples
# Install asset packs
dotnet new install Stride.Templates.AssetPacks
Find the template you want to use. The default project template is named
stride-game. For a list of all Stride templates, use this command:dotnet new list strideCreate the project.
dotnet new TemplateNameHere -n ProjectNameHereOpen Game Studio manually.
Warning
Due to their size, most examples and templates are only updated with minor and major releases. This means that you will have to upgrade them manually to ensure they are on the latest version. This is automatically handled when opening the project via the launcher.